In this issue:
Getting Started with Anterior Implant Placement
Author
Note: The Hahn Tapered Implant System is now known as the Glidewell HT Implant System
Most dentists wisely select posterior cases when they are in the early stages of the learning curve for implant surgery. Although moving from the posterior region of the mouth to the esthetic zone can be intimidating, clinicians can surgically place and restore implants in the anterior with confidence by following some straightforward criteria for success. The primary areas on which to focus include case selection, implant positioning, and prosthetically driven treatment planning.
CASE SELECTION
When placing implants in the esthetic zone, it is important to understand and manage your patients’ expectations. I always tell patients that all restorations in the anterior are difficult — whether implant or traditional crown & bridge — due to challenges with matching the shade and characterization of adjacent teeth. I suggest letting patients know that the restoration will look great, but when they look at it very closely, they may notice a difference. It’s also a good idea to begin with patients who have been part of your practice for some time, as the rapport that you have developed with them often makes it easier to comprehend and meet their expectations.
For the first few anterior cases, you should select clinical situations in which an untreatable tooth is removed, the extraction site is grafted, and the implant is placed after several months of healing. This approach allows you to develop the ideal soft-tissue contours and bone volume needed for straightforward implant surgery and a predictable outcome. Until you have more experience, I would not suggest extraction with immediate implant placement — unless you have Dr. Jack Hahn standing by your side! It’s also important to select patients who have favorable teeth alignment as well as a thick tissue biotype, both of which make it easier to achieve a natural emergence profile and esthetic result. High smile lines should be avoided.
Until you have more experience, I would not suggest extraction with immediate implant placement — unless you have Dr. Jack Hahn standing by your side!
PROPER CASE SELECTION
- Know your patients and manage their expectations
- Extract, graft and wait
- Avoid high smile lines
- Select favorable tooth alignment
- Look for thick tissue biotype
IMPLANT POSITIONING
To achieve an optimal functional and esthetic outcome, the implant must be placed correctly with regard to trajectory, adjacent vital anatomy, and buccolingual, apicocoronal and mesial-distal positioning. Situating the implant so that the edges of the osteotomy are at least 2 mm from the buccal and lingual cortical plates, 2 mm from adjacent roots, 2 mm from vital structures, and 2–3 mm below the crest of tissue will keep the implant within the envelope of acceptability. The implant trajectory should emerge lingual to the incisal edge of the planned restoration, which allows for a screw-retained crown.
IMPLANT PLACEMENT PARAMETERS
- 2 mm of bone buccal and lingual to the osteotomy
- 2–3 mm subgingival to the crest of tissue
- Angulation lingual to the incisal edge
- 2 mm from adjacent teeth and vital structures
RESTORATIVE CONSIDERATIONS
Most patients desire an esthetic result when viewed with a mirror at a 10-inch distance. Placing an implant in a grafted, healed extraction site typically allows for the natural tissue tone and texture patients desire, as well as the keratinized soft tissue needed to fill the embrasures and avoid black triangles around the restoration. Achieving proper apicocoronal implant positioning as described above helps avoid any visible metal at the gum line. It’s also important to choose a ceramic material that blends well with the color, contours and texture of adjacent teeth.
ESTHETIC GUIDELINES FOR THE FINAL RESTORATION
- Natural tissue tone and texture
- Absence of black triangles and metal at the gum line
- Esthetic result from 10-inch distance
- Ceramic material choice: color, contour and texture
CASE REPORT
This case is an example of an ideal clinical situation for dentists who are new to placing implants in the esthetic zone. The patient requested treatment for a fractured upper lateral incisor. After extraction, grafting and healing, ample bone and soft tissue were present, and an implant was placed in optimal position for an esthetic result. The screw-retained restoration predictably restored form and function, illustrating the beautiful results that can be achieved by observing simple surgical and prosthetic guidelines.
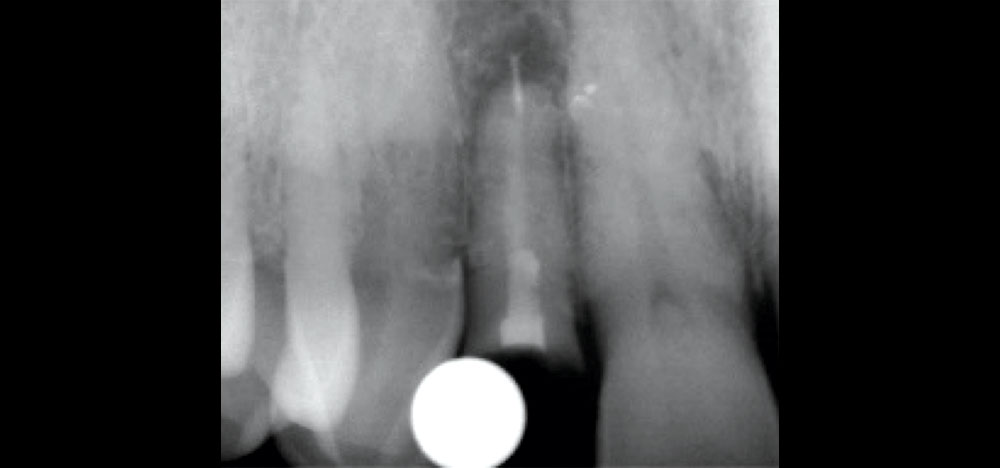
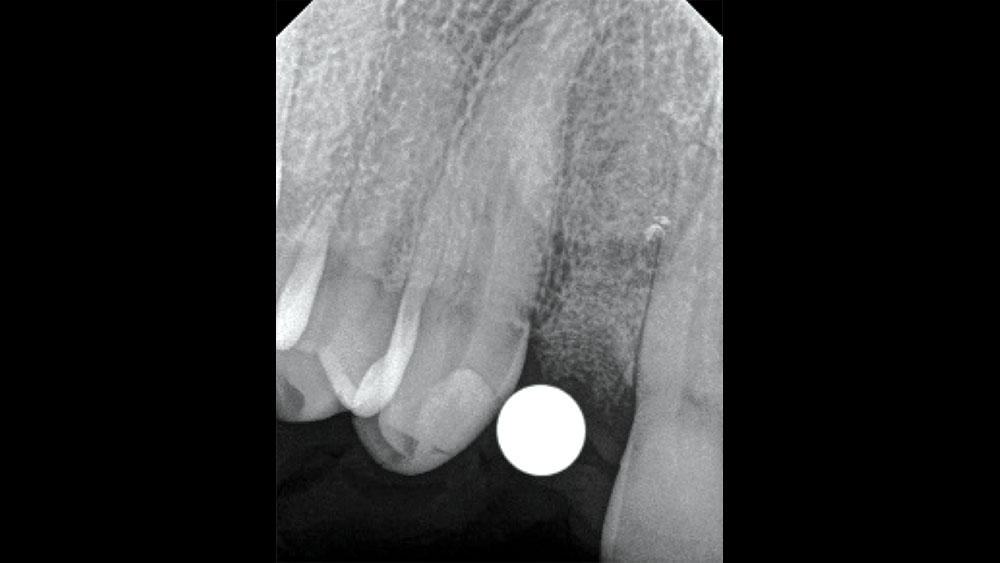
Figure 1: Preoperative radiograph illustrates the patient’s fractured tooth as well as periapical pathology. The X-ray showed adequate bone volume and no interference from adjacent teeth or nearby anatomical structures. After learning his treatment options and the pros and cons of each, the patient chose implant therapy to replace his broken tooth. To ensure predictable bone volume and keratinized soft tissue, the tooth was atraumatically removed using periotomes and the extraction site was grafted.
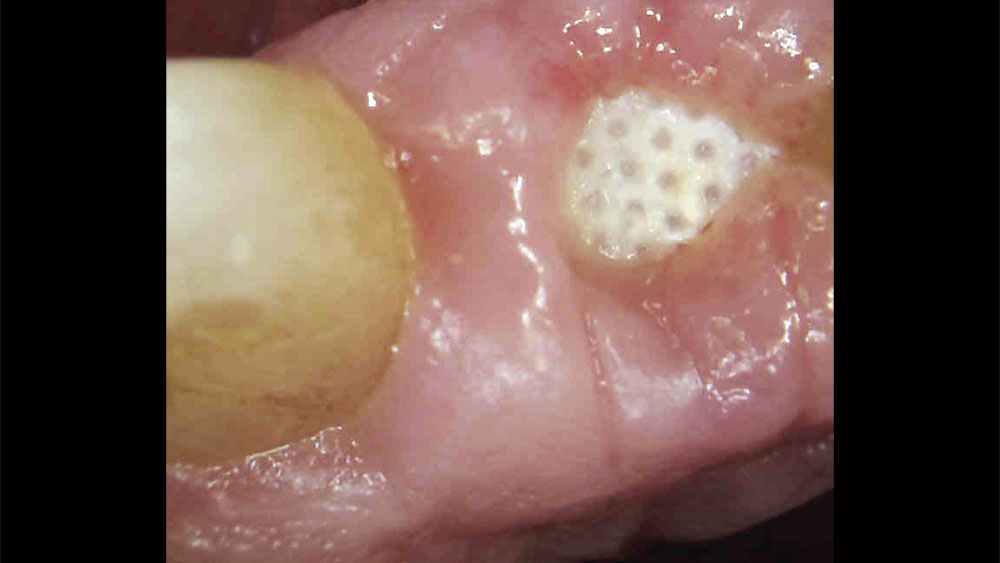
Figure 2: Extraction site after six weeks of healing. At the time of extraction, the socket was grafted with Newport Biologics™ Mineralized Cortico/Cancellous Allograft Blend (Glidewell Direct; Irvine, Calif.) to preserve the ridge and create predictable bone volume for implant placement. The use of the barrier membrane contributed to the thick, keratinized soft tissue in the area, the presence of which is essential for implant practitioners new to the anterior because it simplifies the establishment of a natural emergence profile and helps avoid metal showing through the soft tissue.
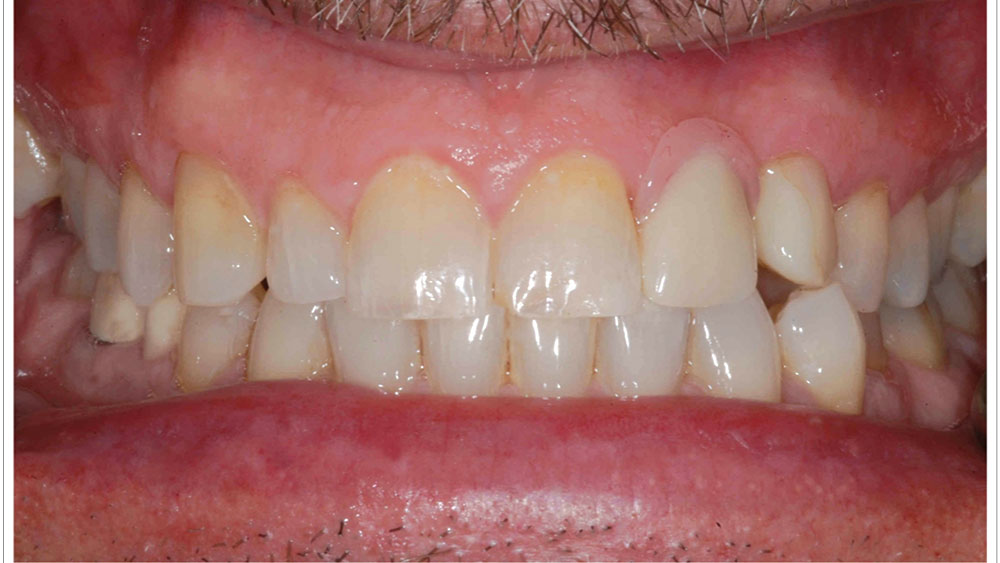
Figure 3: During the healing phase of treatment, the patient wore an interim flipper with an ovate pontic design to intiate soft-tissue development. After performing a tooth extraction and bone grafting procedure, I have found that the discomfort and poor stability of removable appliances tend to reinforce or motivate the patient’s decision to move forward with implant treatment.
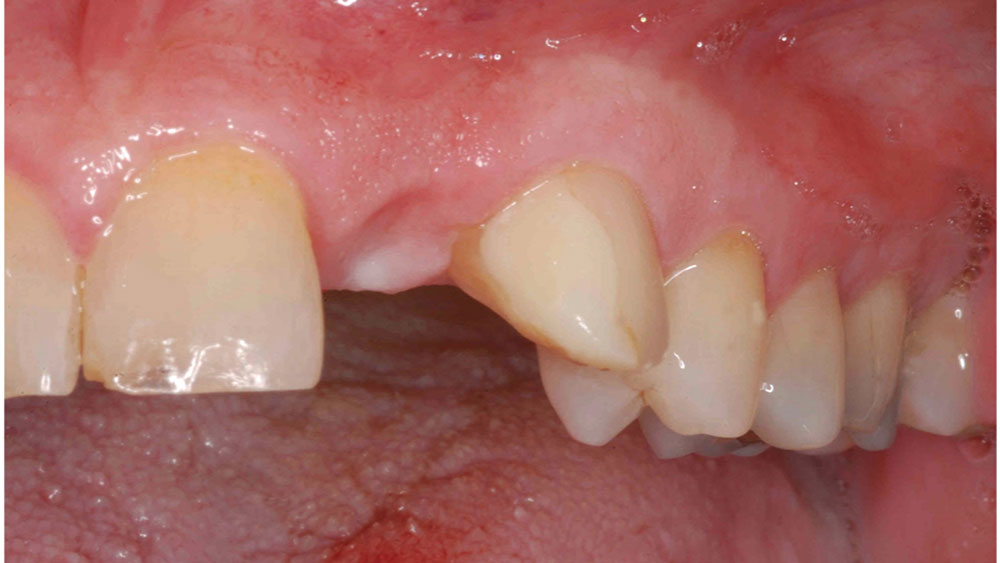
Figures 4a, 4b: After five months of healing, keratinized soft tissue and ample bone volume were present at the edentulous site — characteristics that are common in cases where a tooth is extracted and the extraction socket is grafted. Note the development of interdental papillae and emergence profile.
Figures 4a, 4b: After five months of healing, keratinized soft tissue and ample bone volume were present at the edentulous site — characteristics that are common in cases where a tooth is extracted and the extraction socket is grafted. Note the development of interdental papillae and emergence profile.
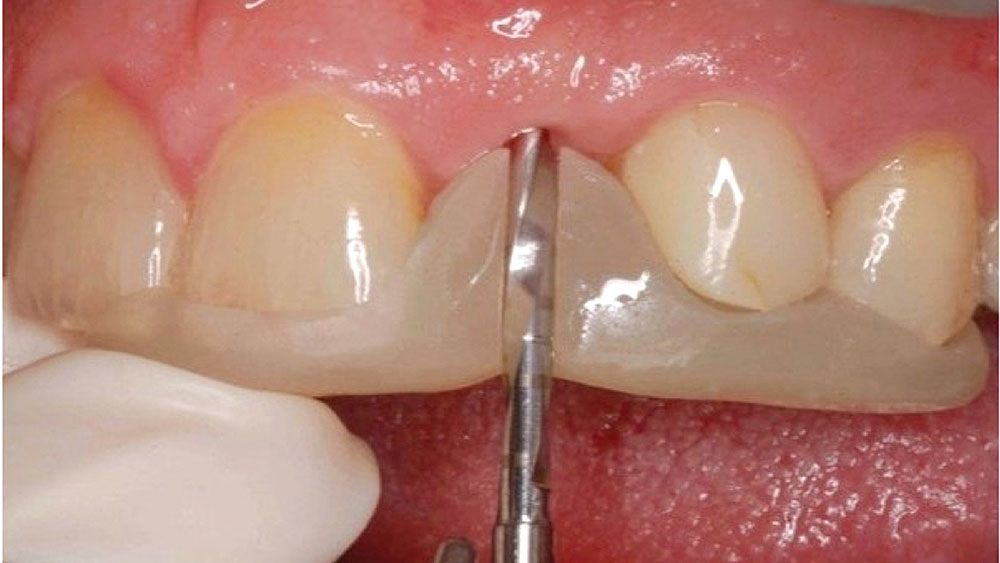
Figure 5: A 2 mm pilot drill was used to create the initial osteotomy through a non-digital surgical template, which was created in-office using a diagnostic model to help establish proper positioning for the implant. Similar surgical guides can also be ordered from Glidewell Laboratories. When creating the osteotomy, the adjacent teeth were used as visual guides and helped confirm proper alignment of the drills lingual to the incisal edges of the teeth.
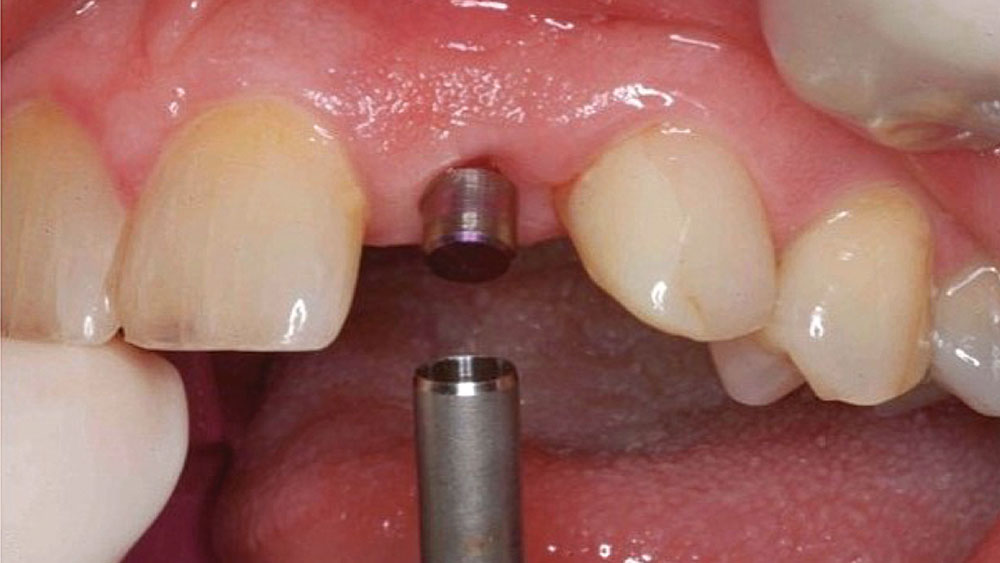
Figure 6: A surgical punch was used to remove soft tissue at the implant site, facilitating a flapless procedure and thus simplifying the creation of soft-tissue esthetics for the eventual restoration and helping avoid black triangles. When a flapless protocol cannot be followed, I recommend using a papilla-sparing incision technique.
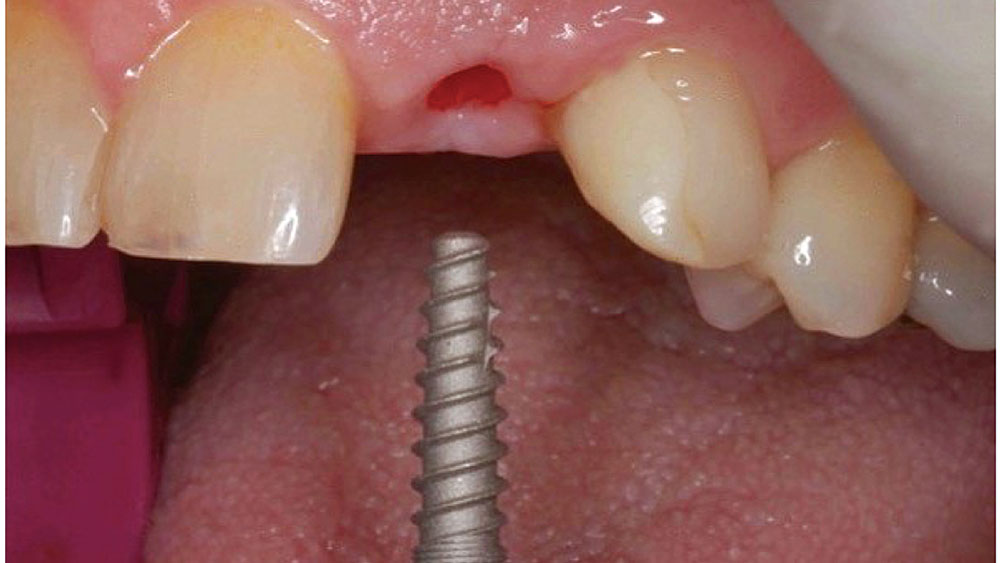
Figure 7: After completing the osteotomy using an easy-to-follow surgical protocol, a Hahn™ Tapered Implant (Glidewell Direct) was inserted. I have used implants designed by Dr. Jack Hahn — one of my earliest mentors — ever since he created the original tapered implant for Steri-Oss and Nobel Biocare. The aggressive thread design of the Hahn Tapered Implant provides high initial stability, while its machined collar encourages the formation of healthy tissue — characteristics that are essential to a predictable outcome in the anterior.
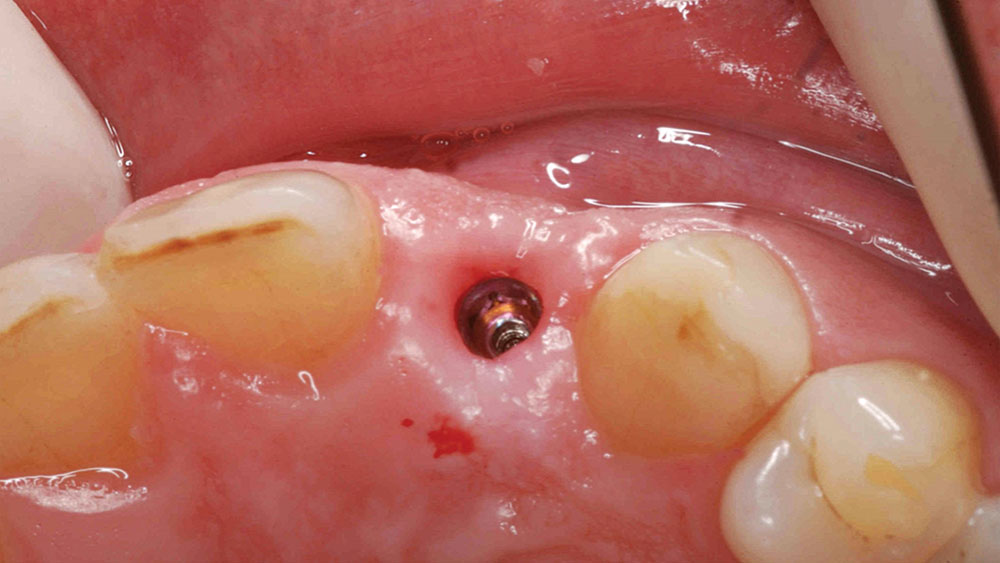
Figure 8: Final positioning of the Hahn Tapered Implant. Care was taken to situate the implant with 2 mm of space between the implant and the adjacent buccal, lingual, mesial and distal surfaces, as well as at the appropriate depth needed to support an esthetic final restoration.
Figures 9a, 9b: With high primary stability established, a healing abutment was connected to the implant, which would further help contour the soft tissue for the restoration. Note how the driver used to deliver the healing abutment is positioned lingual to the incisal edge of the adjacent teeth, illustrating correct implant angulation for the planned screw-retained restoration.
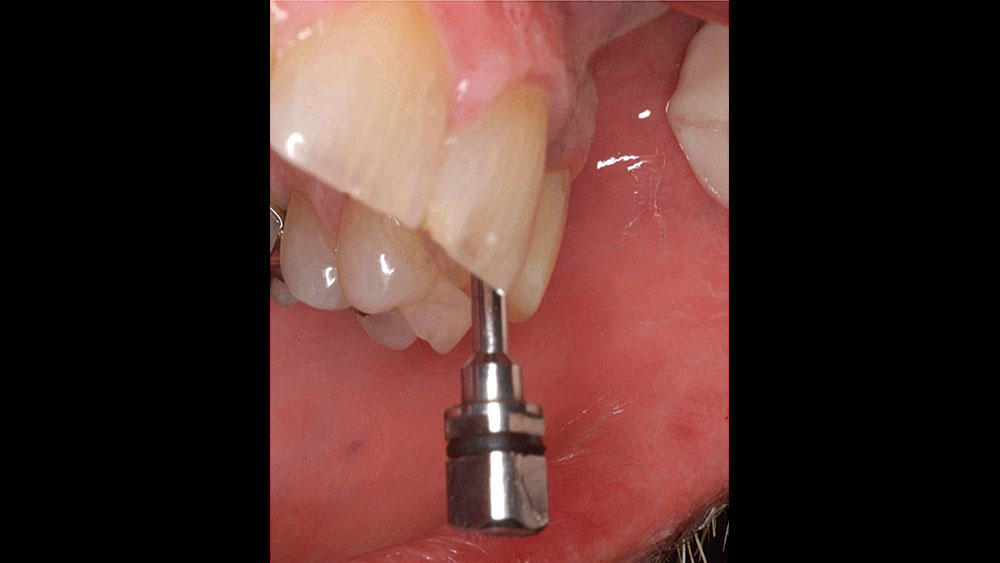
Figures 9a, 9b: With high primary stability established, a healing abutment was connected to the implant, which would further help contour the soft tissue for the restoration. Note how the driver used to deliver the healing abutment is positioned lingual to the incisal edge of the adjacent teeth, illustrating correct implant angulation for the planned screw-retained restoration.
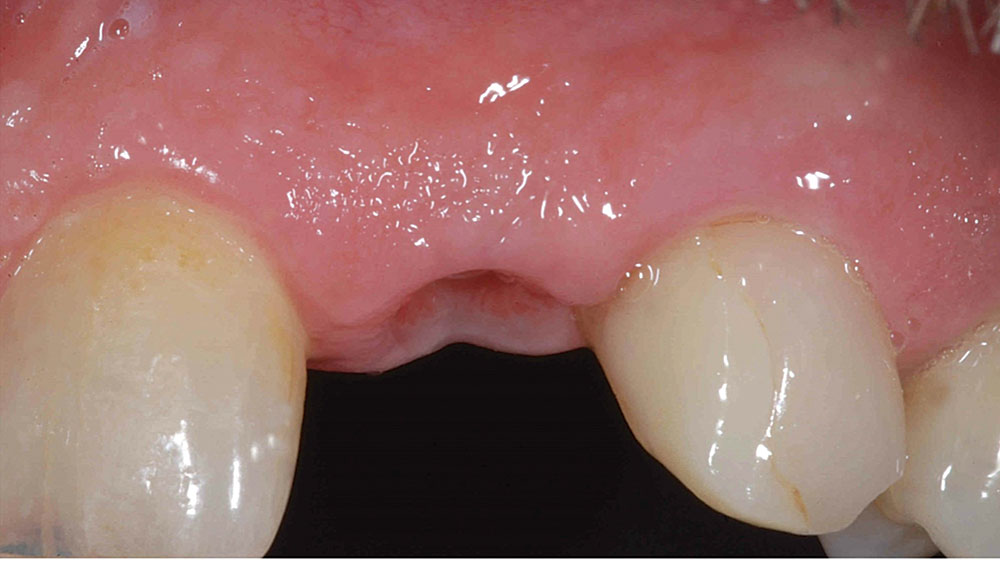
Figures 10a, 10b: Six-month post-op images illustrate thick soft tissue surrounding the implant site as well as healthy sulcular tissue.
Figures 10a, 10b: Six-month post-op images illustrate thick soft tissue surrounding the implant site as well as healthy sulcular tissue.
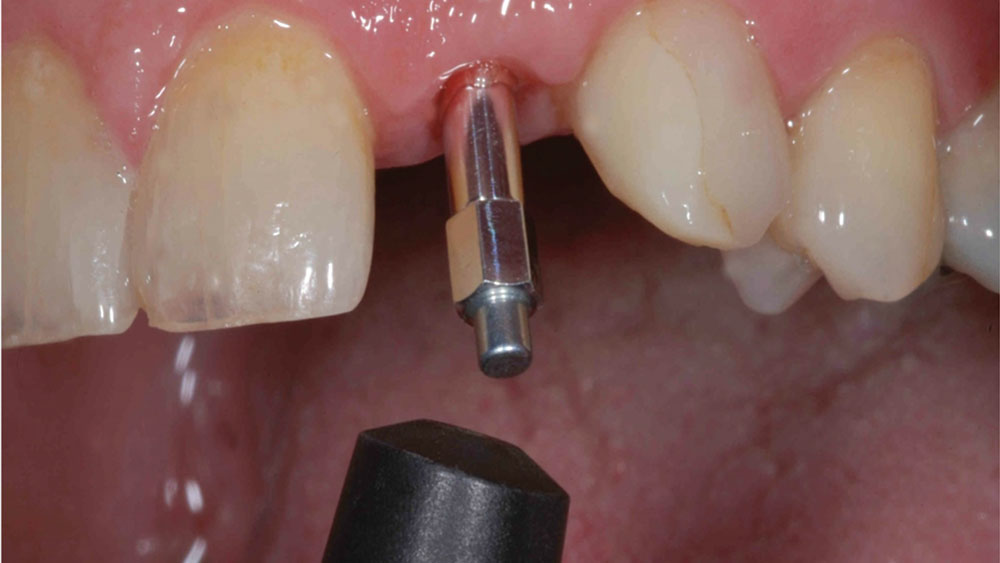
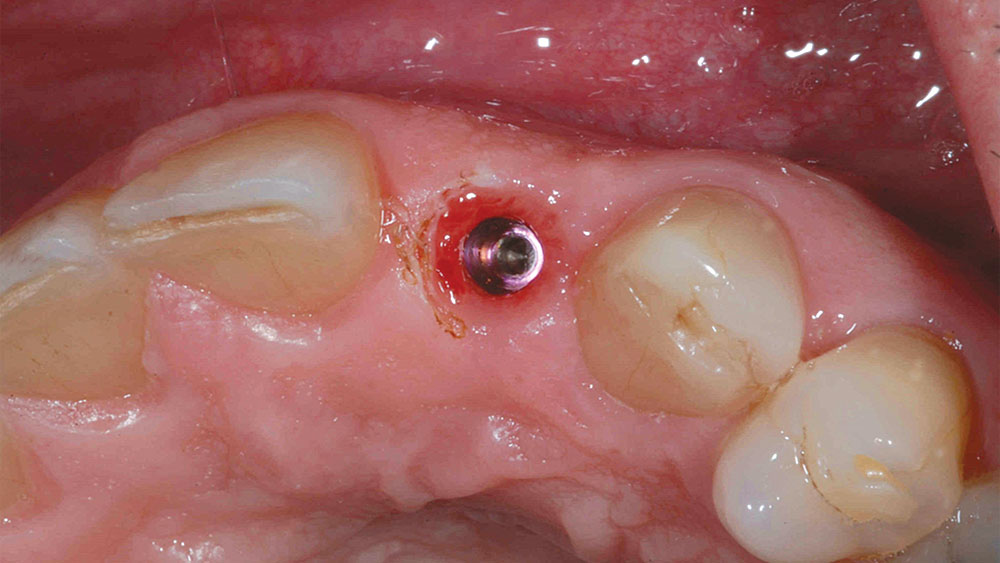
Figure 11: The stability of the implant was measured before moving forward with the restorative phase of treatment. The Penguin RFA® (Glidewell Direct) offers an excellent means of confirming the stability of Hahn Tapered Implants.
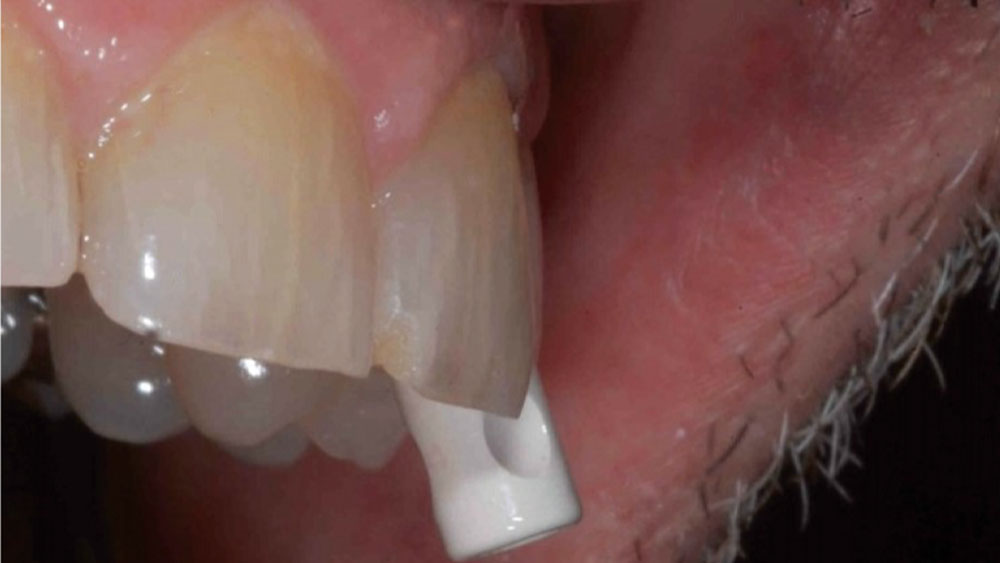
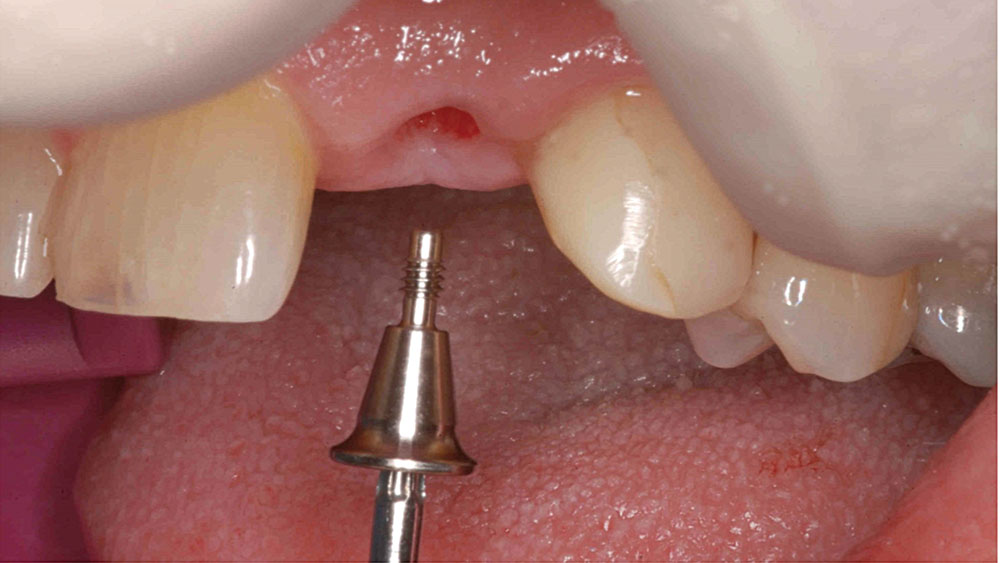
Figure 12: A digital impression was created using a TRIOS® intraoral scanner (3Shape North America; Warren, N.J.) and a Hahn Scanning Abutment (Glidewell Direct). The intraoral scan was sent to the lab, and a screw-retained crown was prescribed to simplify restoration delivery.
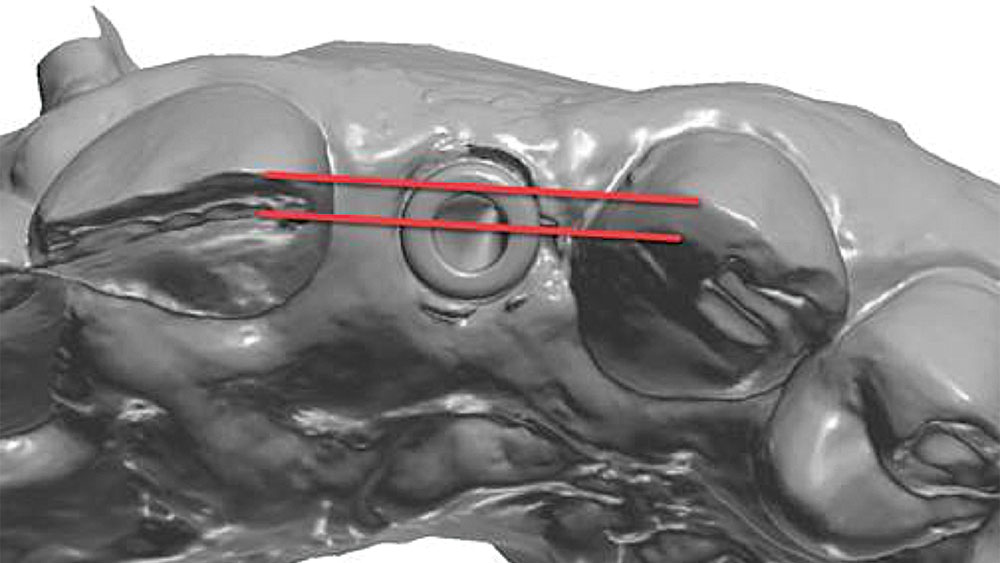
Figure 13: The intraoral scan was used as a virtual model upon which the screw-retained implant restoration was designed, and digital case submission resulted in a reduced lab fee. The red lines illustrate how the implant’s trajectory allows for screw access holes behind the incisal edges of the adjacent teeth.
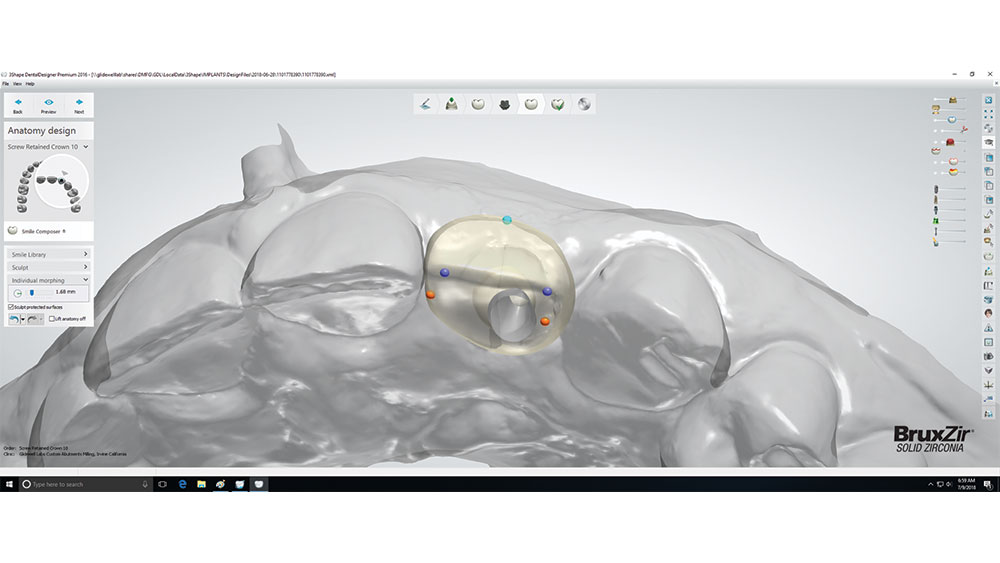
Figures 14a–14c: The crown design was a collaborative effort between me and the dental lab, which provided digital design images so that I could review and offer input on the contacts, margins, esthetics and occlusion. The screw-retained restoration was milled from BruxZir® Esthetic Solid Zirconia to ensure a beautiful result in the anterior. The crown was delivered with ease and aligned perfectly with the soft-tissue contours. Note the precise match between the CAD image and the restoration seated in the patient’s mouth. Teflon tape and composite were used to seal the screw access hole.

Figures 14a–14c: The crown design was a collaborative effort between me and the dental lab, which provided digital design images so that I could review and offer input on the contacts, margins, esthetics and occlusion. The screw-retained restoration was milled from BruxZir® Esthetic Solid Zirconia to ensure a beautiful result in the anterior. The crown was delivered with ease and aligned perfectly with the soft-tissue contours. Note the precise match between the CAD image and the restoration seated in the patient’s mouth. Teflon tape and composite were used to seal the screw access hole.
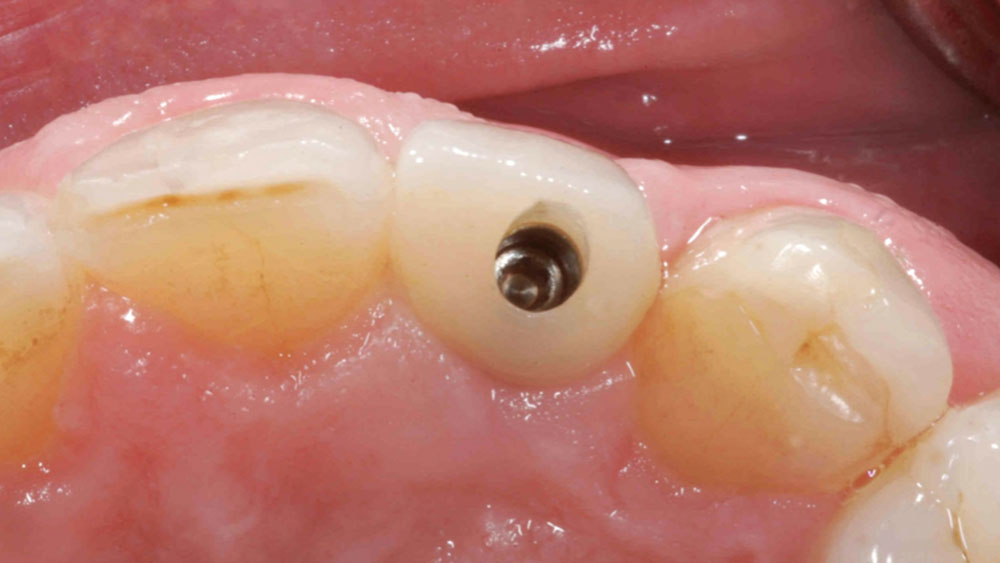
Figures 14a–14c: The crown design was a collaborative effort between me and the dental lab, which provided digital design images so that I could review and offer input on the contacts, margins, esthetics and occlusion. The screw-retained restoration was milled from BruxZir® Esthetic Solid Zirconia to ensure a beautiful result in the anterior. The crown was delivered with ease and aligned perfectly with the soft-tissue contours. Note the precise match between the CAD image and the restoration seated in the patient’s mouth. Teflon tape and composite were used to seal the screw access hole.
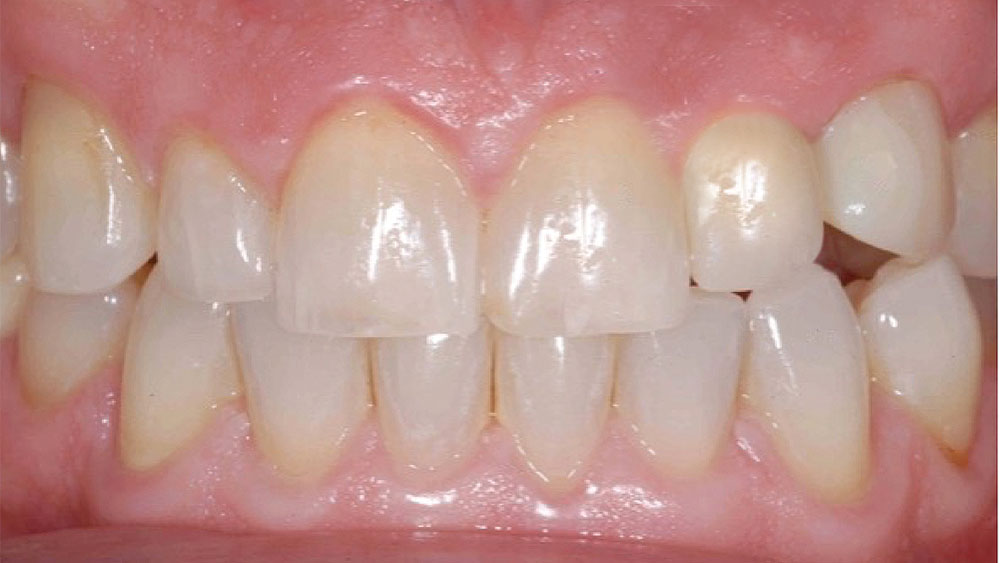
Figure 15: The patient was very pleased with the end result, which was produced by following straightforward case selection, implant placement and restorative guidelines.
- 1
- 2
- 3
- 4
- 5
- 6
- 7
- 8
- 9
- 10
- 11
- 12
- 13
- 14
- 15
- 16
- 17
- 18
- 19
- 20
CONCLUSION
Implant placement in the esthetic zone is well within the ability of the dentist who has mastered the posterior and is ready to expand the services offered by his or her practice. By carefully selecting and diagnosing the case, practicing restorative-driven treatment planning, and adhering to proven surgical principles, a predictable result is achieved that satisfies the expectations of doctor and patient alike.