In this issue:
4 Simple Tips for Superb Dental Photographs
Author

Photography is a vital part of today’s dental practice, from both a medico-legal and a patient marketing perspective. Capturing your cases, from pre-op through final results, provides you and your team with valuable information while affording patients an increased sense of value and a fuller understanding of their treatment. High quality, informative case photos are also a great addition to your marketing efforts.
To maximize the usefulness of the dental photographs you take, it’s important to ensure that you’re getting the best-quality shots possible. Here are four important tips for taking excellent clinical photographs that any doctor or team member can implement with a minimal investment of time and materials.
TIP NO. 1: PATIENT POSITIONING FOR FACE PHOTOGRAPHS
Position your patient or subject in a manner that optimizes the image while still ensuring the subject is comfortable enough to appear relaxed and natural. To accomplish this, adjust the patient’s pose in a way that requires no angling or turning of the head or neck. Head turning, which is a common mistake in dental photography, results in tension, stretching and unnatural positioning of the muscles in the neck, face and jaw. This, in turn, leads to photos that not only are less appealing but also show a distorted version of the very facial structures you’re attempting to document.
Locate a spot within your office where the patient can stand, ideally with a neutral-colored wall as a backdrop and adequate ambient lighting. Ensure that there is enough space in the area for the photographer to stand directly facing the patient from a few feet away (depending on how much of the patient’s body you want visible in the shot). From there it’s easy to take head-on facial shots with the patient looking directly ahead in a relaxed position.
For profile shots, the same room setup will apply, but the instructions differ slightly. To achieve a profile shot without the temptation for the patient to turn or tense their neck, instruct them to turn their entire body — starting with their feet — to face the perpendicular wall. This will result in their profile facing the camera lens with no craning or stretching required.
Note that if your patient is seated in the dental chair rather than standing up, it falls upon the photographer to ensure that the camera is positioned directly in front of the subject. Make sure there’s enough room to achieve that without equipment getting in the way. For profile shots, either turn the dental chair itself sideways, or reposition yourself and the camera at a 90-degree angle while the patient continues to face straight ahead.
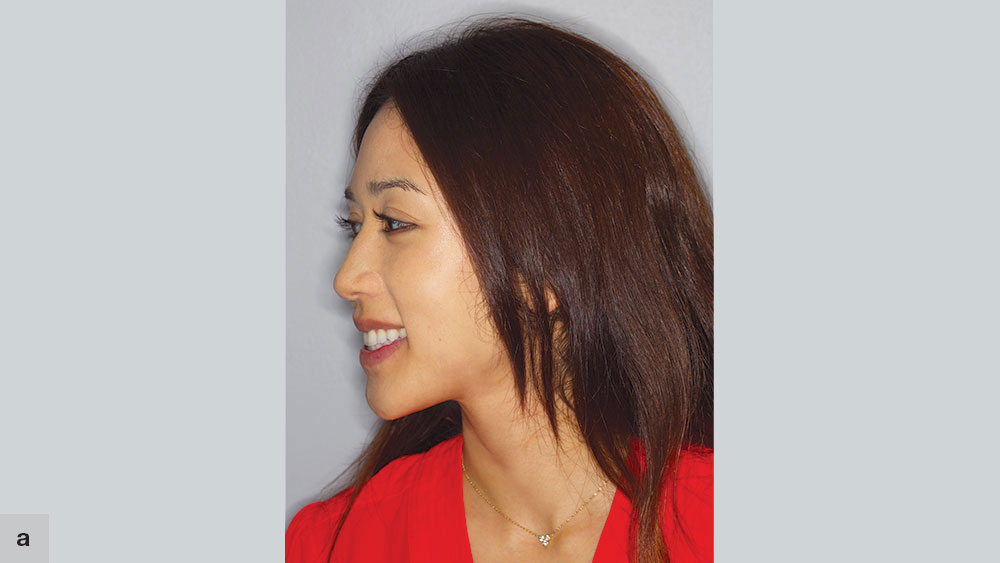
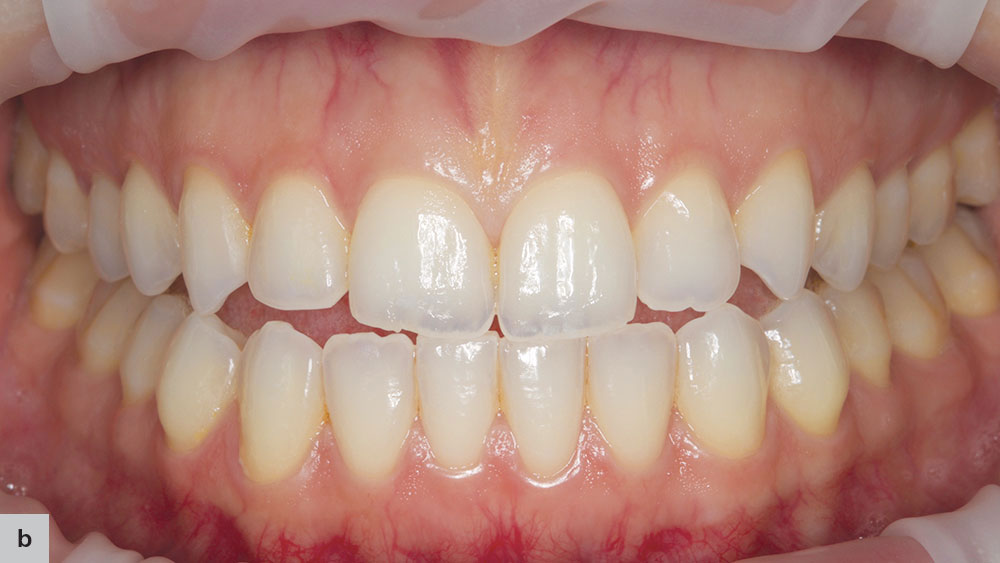
For these profile images, the subject first turned her head without repositioning the rest of her body, resulting in awkward tension and unnatural positioning of the neck and jaw (a). She was then asked to turn her body, starting with her feet, to the perpendicular wall, while the photographer remained in the same position. The resulting shot successfully documented the natural shape and position of her jaw, face and neck (b).
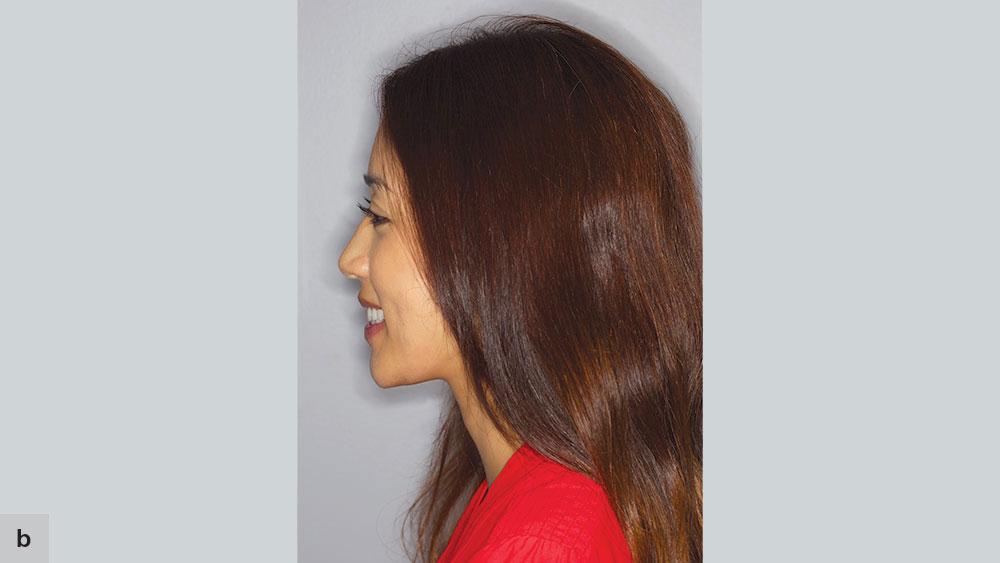
For these profile images, the subject first turned her head without repositioning the rest of her body, resulting in awkward tension and unnatural positioning of the neck and jaw (a). She was then asked to turn her body, starting with her feet, to the perpendicular wall, while the photographer remained in the same position. The resulting shot successfully documented the natural shape and position of her jaw, face and neck (b).
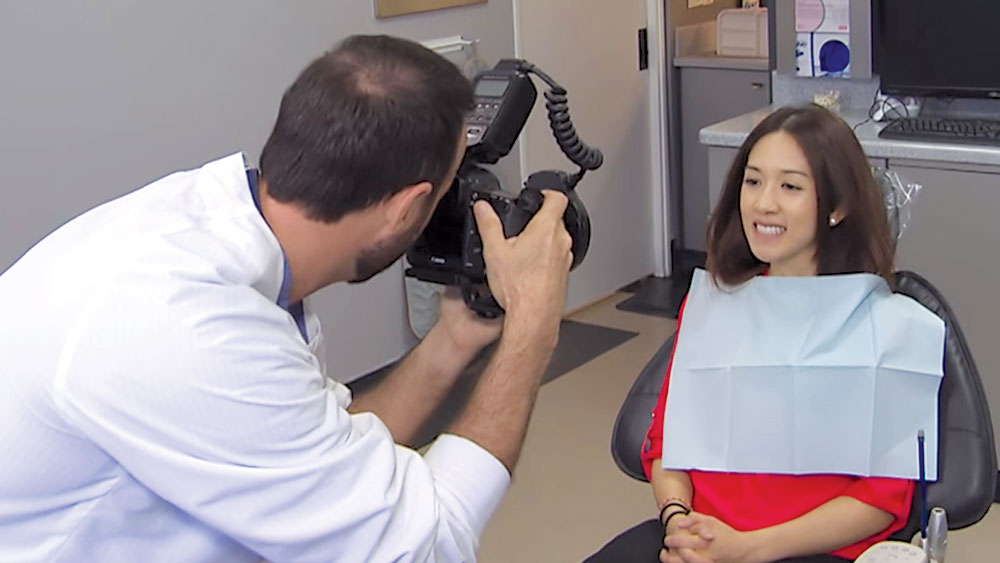
For seated photos, take advantage of the headrest by positioning it in such a way that the subject’s head is fully supported just where you need it, making it easier for the patient to hold the position throughout the duration of the photos.
TIP NO. 2: CAMERA POSITIONING FOR SMILE PHOTOGRAPHS
The most important aspects to consider when shooting close-up photos of your patient’s smile are where and how you hold the camera. Because these shots are taken at close range with a narrow depth of field, the camera position has a considerable impact on the final results. Correct camera placement minimizes distortions and creates shots that are as clear and close to reality as possible.
For these close-up shots, remember that the camera should be at a 90-degree angle from the teeth. The lens and the teeth should be perpendicular to one another, whether you’re shooting head-on or from a lateral view.
Holding the camera too high, or angling the patient’s chin too low, will both result in a foreshortening of the smile due to the steepness of the angle. The opposite occurs if the camera is held too low, or if the patient’s chin is angled too high. The resulting photo will cause the shape of the mouth to appear as a reverse smile with the corners turning downwards.
These angulation errors are common, but they’re also simple to avoid provided you pay attention to your camera positioning before each shot. Ensure that the teeth and the camera lens are level and as close to perpendicular as possible, and the resulting images will be free from distortion and will provide excellent documentation of the real-life smile.
It’s important to note that the ideal 90-degree angle can be tricky to accomplish when taking photos of difficult-to-reach posterior teeth. In these situations, use a clean intraoral mirror with a long handle to retract the cheeks and reflect the subject area at a more direct angle. Then, take a photo of the reflected image.
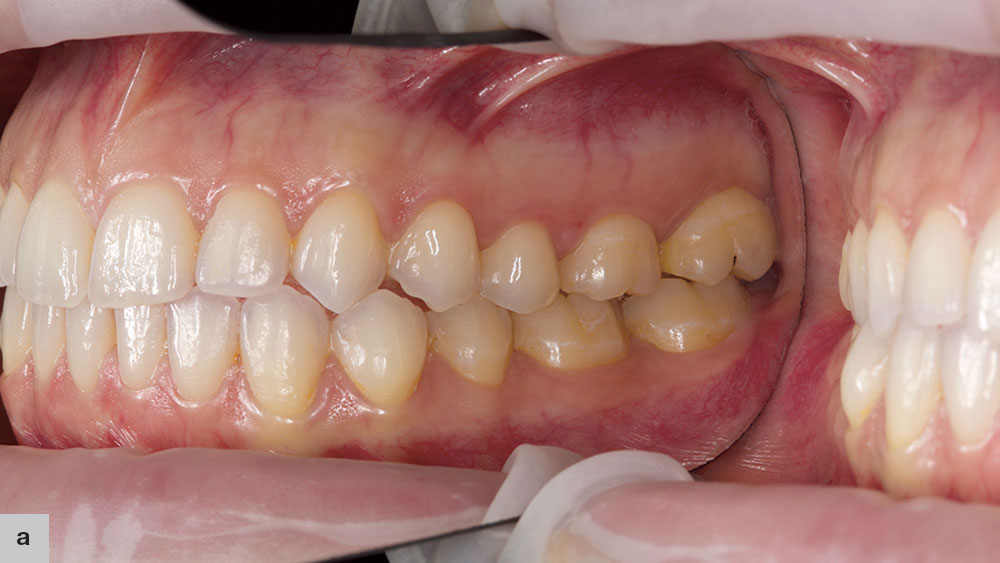
These smile images were taken from angles that were either too high (a) or too low (b), causing image distortion. Either the camera was held in the wrong position, or the patient’s chin was tilted too much. Note how the posterior teeth seem to curve up or down in each shot.
These smile images were taken from angles that were either too high (a) or too low (b), causing image distortion. Either the camera was held in the wrong position, or the patient’s chin was tilted too much. Note how the posterior teeth seem to curve up or down in each shot.
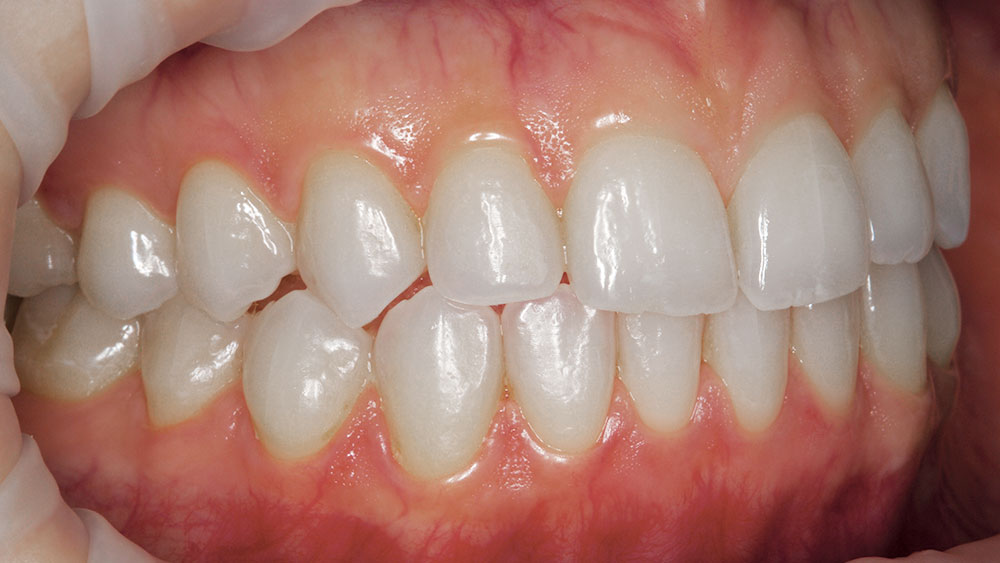
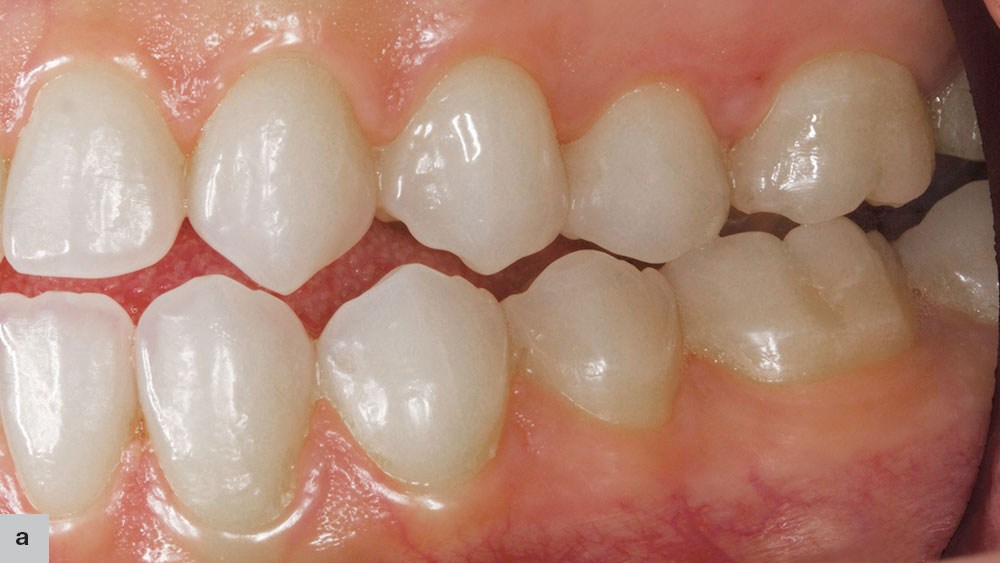
In this shot, the camera was held at a 90-degree angle from the teeth. Notice how a nice horizontal plane is created without slanting up or down. This also results in better documentation of the bite and the size of the teeth, which incorrect angling can distort.
For these difficult-to-reach posterior teeth, the photographer used an intraoral mirror to reflect the desired area (a), and then took a photo of the image that appeared on the mirror surface. That photo was cropped to remove the mirror edges (b). Because this image was a reversed reflection, the image was flipped horizontally in photo-editing software to achieve the final accurate result (c).
For these difficult-to-reach posterior teeth, the photographer used an intraoral mirror to reflect the desired area (a), and then took a photo of the image that appeared on the mirror surface. That photo was cropped to remove the mirror edges (b). Because this image was a reversed reflection, the image was flipped horizontally in photo-editing software to achieve the final accurate result (c).
For these difficult-to-reach posterior teeth, the photographer used an intraoral mirror to reflect the desired area (a), and then took a photo of the image that appeared on the mirror surface. That photo was cropped to remove the mirror edges (b). Because this image was a reversed reflection, the image was flipped horizontally in photo-editing software to achieve the final accurate result (c).
- 1
- 2
- 3
- 4
- 5
- 6
TIP NO. 3: POSING THE BITE FOR INTRAORAL PHOTOGRAPHS
When asked to perform a specific action with their teeth such as biting down, patients are inclined to overthink the movement and give you an unnatural or exaggerated version. When taking intraoral photographs, this kind of artificial bite will inaccurately represent the condition or position of the dentition.
When shooting intraoral images, keep your eyes open for protrusion of the jaw, stretched smiles, and bites that don’t match natural centric occlusion.
When shooting intraoral images, keep your eyes open for protrusion of the jaw, stretched smiles, and bites that don’t match natural centric occlusion. Correcting these issues when taking dental photographs is accomplished just as it is during routine dental treatment. When the patient performs the action requested but does it in an unnatural way, be prepared to provide more specific instructions to correct the motion. It can help, for example, to ask a patient who is having trouble biting down naturally to “bite down on the back teeth.” This kind of cue allows them to focus on how the action typically feels outside of the dental chair, and to adjust their current bite accordingly.

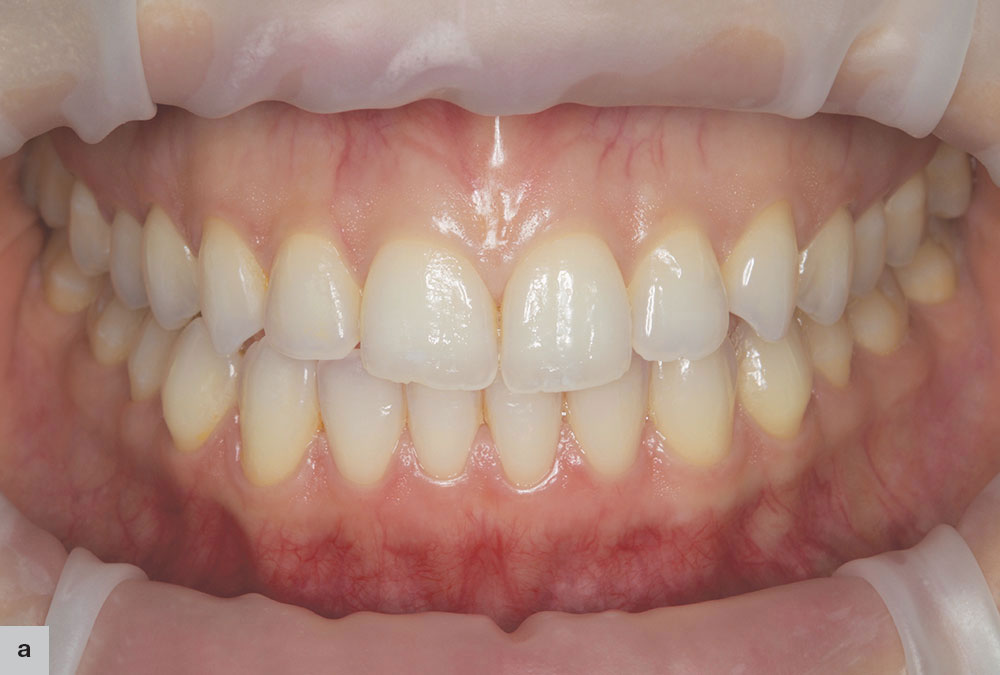
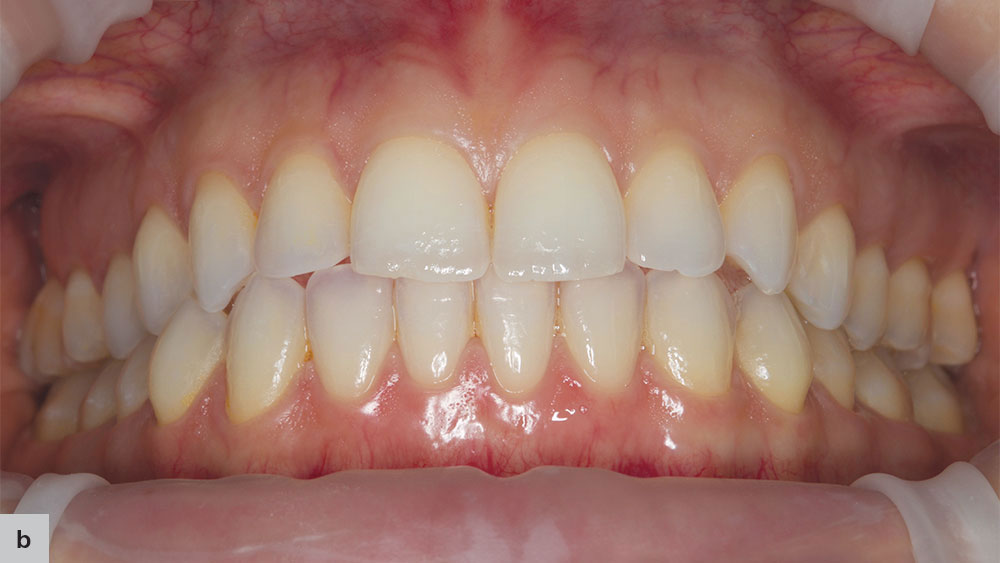
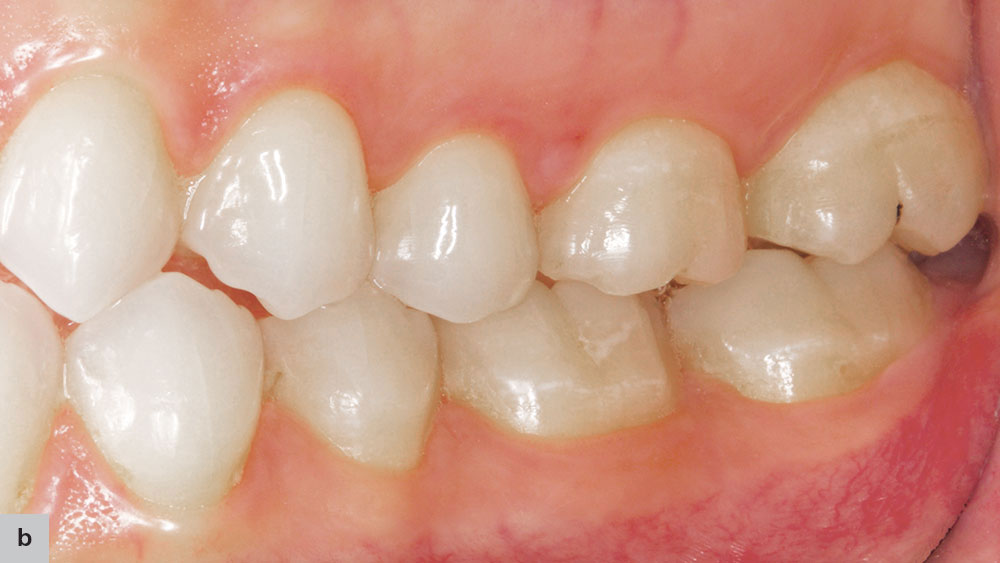
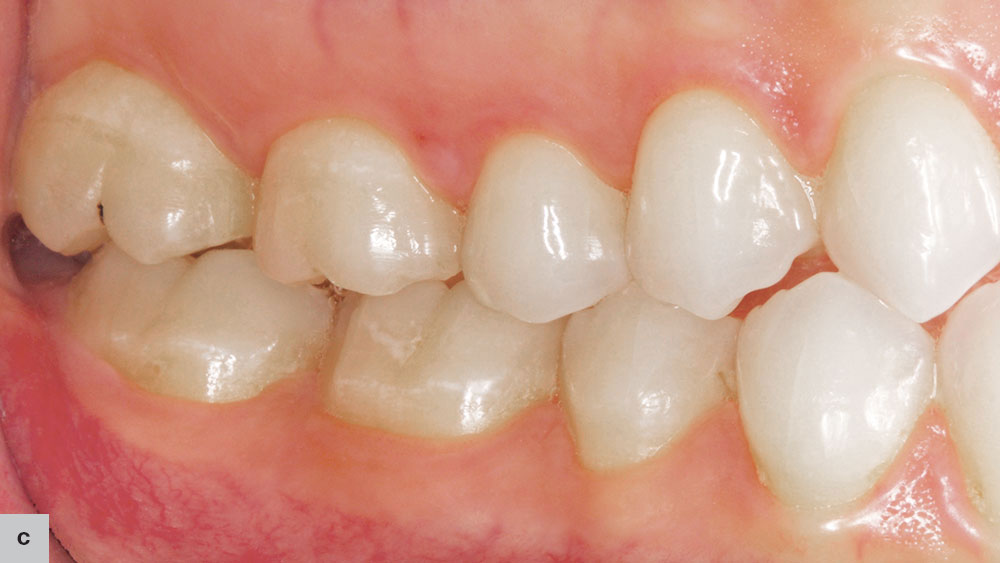
These images illustrate the differences between a patient presenting an artificial bite versus the same patient being instructed to bite down naturally. At first, the bite presented was artificially posed (a, b); once the patient was instructed on how to present a natural bite, the resulting images were a much better documentation of her natural occlusion (c, d).
TIP NO. 4: MAXIMIZING RESULTS WITH COMPLETE PHOTO SETS
When it comes to dental case photography, there’s one final factor to consider: the completeness of your photo documentation. No case study is complete without a full set of photos that records the treatment process. This holds true whether the photos are intended for use as marketing tools, educational resources or patient records.
To that end, when using photography to document your cases, take pictures at all stages of the treatment process. A photo set of a restoration case, for example, might include a shot list consisting of:
- “Before” images of the patient
- Shade shots illustrating the real-life color of teeth
- Images of the teeth after preparation
- Stump shade images
- Images of the provisional
- Images of the final seating process
- Any post-procedural checks
- “After” shots of the patient
Having this data illustrated with a set of photographs is also useful when explaining individual treatment plans to patients. Being able to do so in a concise yet complete way raises the value of the investment in the patient’s eyes, and increases their satisfaction with the treatment process.
For best results, ensure that all photos within a case set are taken under similar, consistent conditions. If each stage of the process is shown with similar lighting, angulation and surroundings, it makes it easier to compare differences in the dentition itself and analyze the progression of the treatment process.
The case study below is an excellent example of how to document a case via dental photographs. These images were taken throughout the course of a patient’s restorative treatment, relying upon the tips above for guidance. The resulting photo set shows a clear and concise progression of treatment from start to finish, ideal not only for presenting to the patient, but also for use in education or marketing.
EXAMPLE CASE STUDY
Photographs courtesy of Will Schmidt, RDA
Clinical dentistry by Anamaria Muresan, DMD, ME, CDT

Figure 1: This patient presented with a root canal-treated tooth #7 that was damaged and discolored, and required a crown restoration. This “before” shot documents the condition of that tooth, as well as the difference in shade between it and the rest of the dentition. In shots such as these, proper lighting and angulation are key.
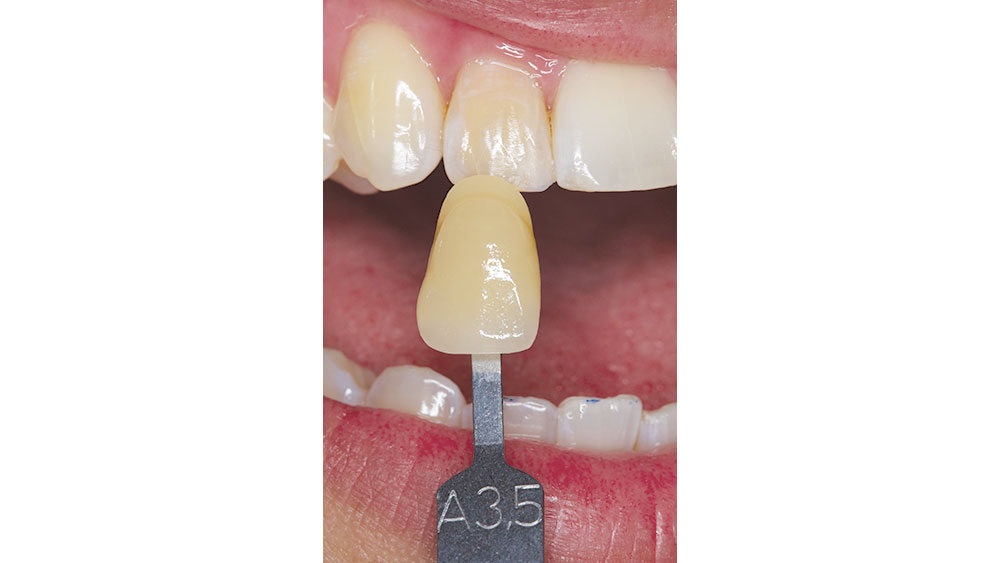
Figure 2: The preoperative condition. For this shot, the photographer included a shade-matching sample to further document the color of the existing tooth, as well as the contrast between that tooth and the ones surrounding it.
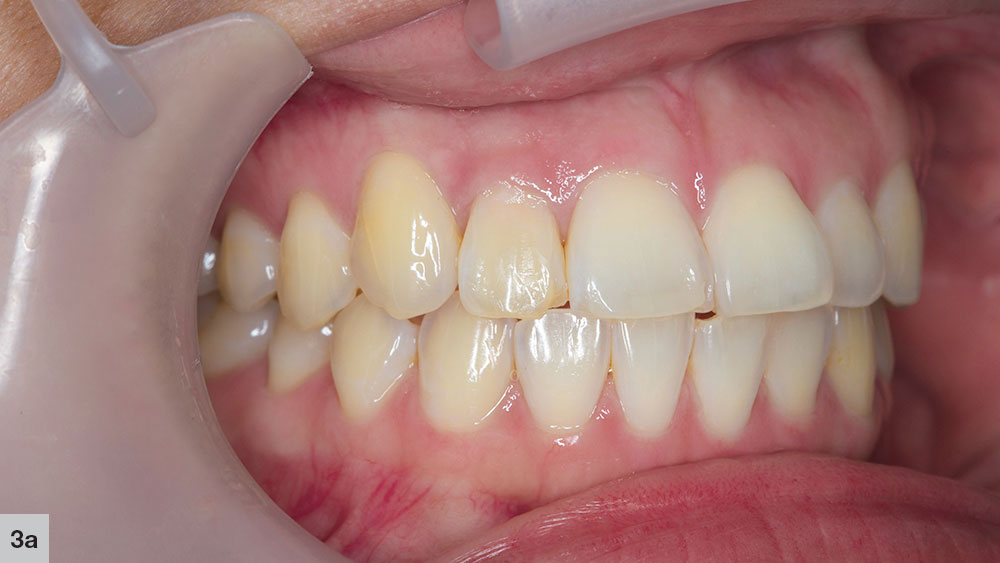
Figures 3a, 3b: To achieve the maximum shade level, in-office internal bleaching was performed on the tooth, and the patient was given the materials to perform three weeks of at-home bleaching. At the end of that time period, she returned to the office for the next steps. This shot documents the improved shade of tooth #7 after the bleaching treatments. Lip and cheek retractors were used to get a clear view of the area (3a), and were cropped from the shot afterward (3b).

Figures 3a, 3b: To achieve the maximum shade level, in-office internal bleaching was performed on the tooth, and the patient was given the materials to perform three weeks of at-home bleaching. At the end of that time period, she returned to the office for the next steps. This shot documents the improved shade of tooth #7 after the bleaching treatments. Lip and cheek retractors were used to get a clear view of the area (3a), and were cropped from the shot afterward (3b).

Figure 4: Depth cuts were placed to ensure the preparation was reduced to the restorative material’s required dimensions, and documented via photo for the case file.
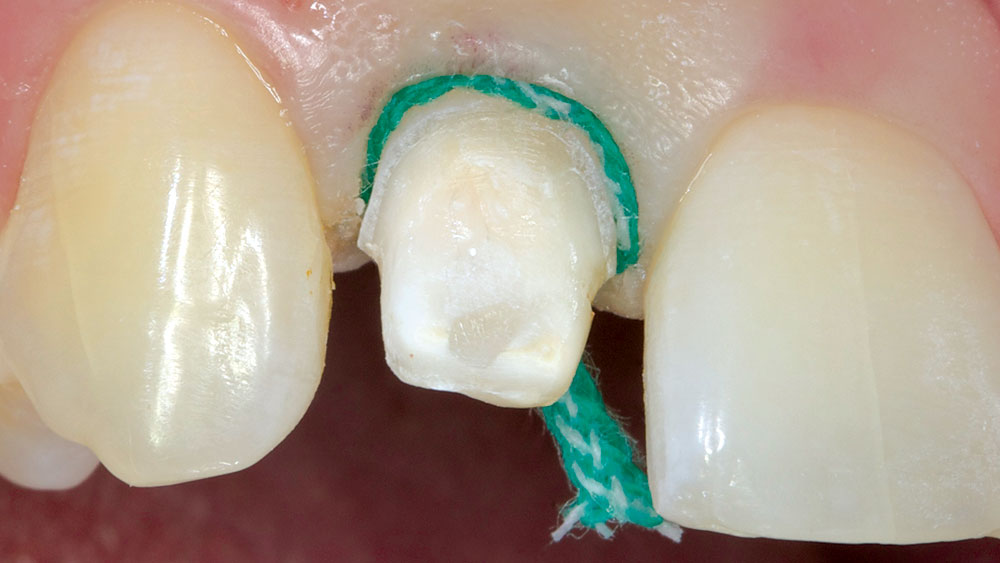
Figure 5: Initial retraction was achieved with an Ultrapak® E #00 cord (Ultradent Products, Inc.; South Jordan, Utah), followed by an Ultrapak #2 cord to retract the tissue laterally, in order to take impressions for the new restoration.
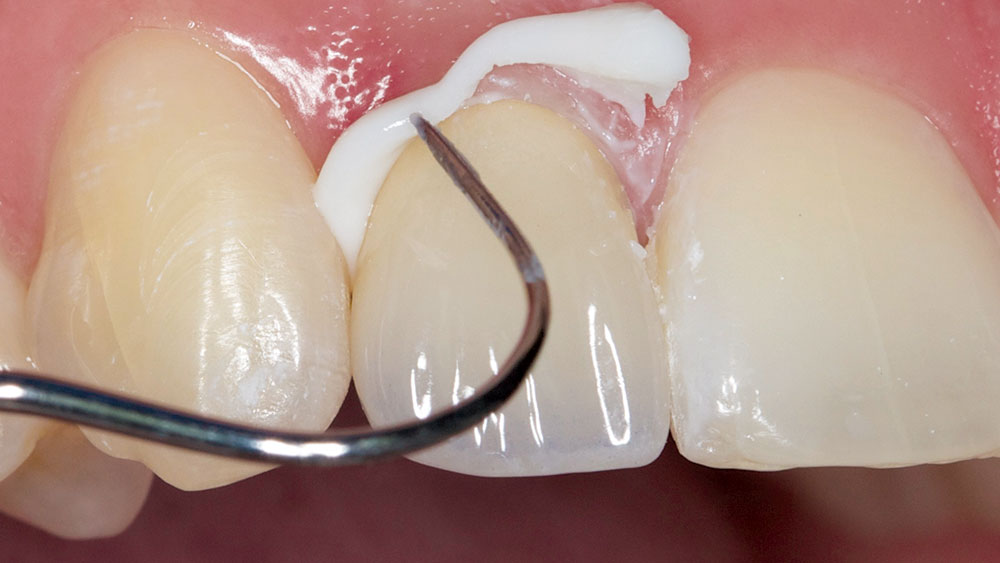
Figure 6: The new restoration was delivered and documented. Obsidian® Fused to Metal was selected as the restoration of choice in this case due to its ability to cover dark preparations, its natural appearance, and its fracture resistance and durability. Here, the crown has been seated using Ceramir® Crown & Bridge cement (Doxa Dental; Newport Beach, Calif.), and the excess is being removed from the interproximal spaces.

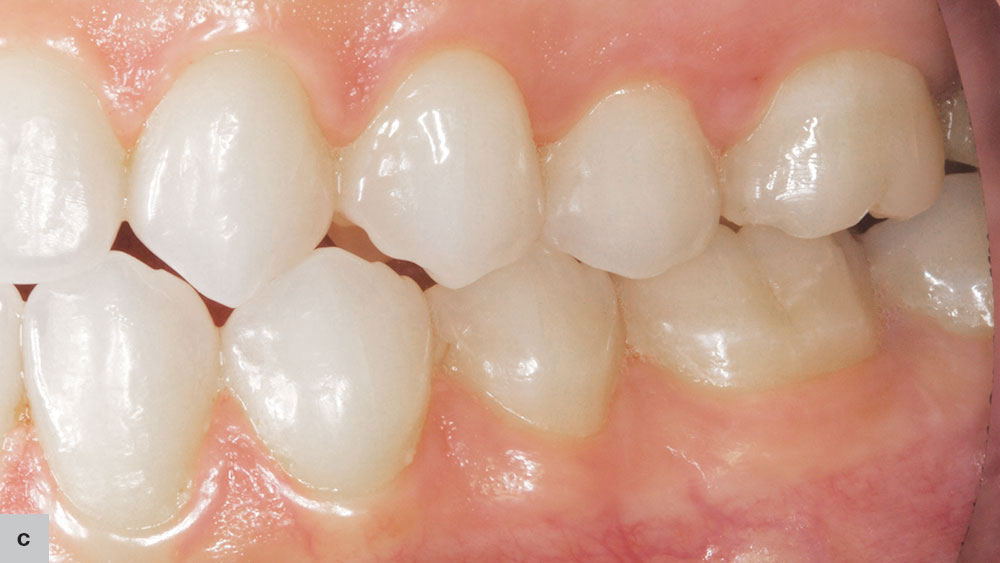
Figure 7: A clean, close-up image of the final restoration in place. This shot was taken with excellent lighting, a perpendicular angle and no distractions. Note how the photographer included the surrounding teeth in the shot to illustrate the color and size match between the new restoration and the existing dentition.
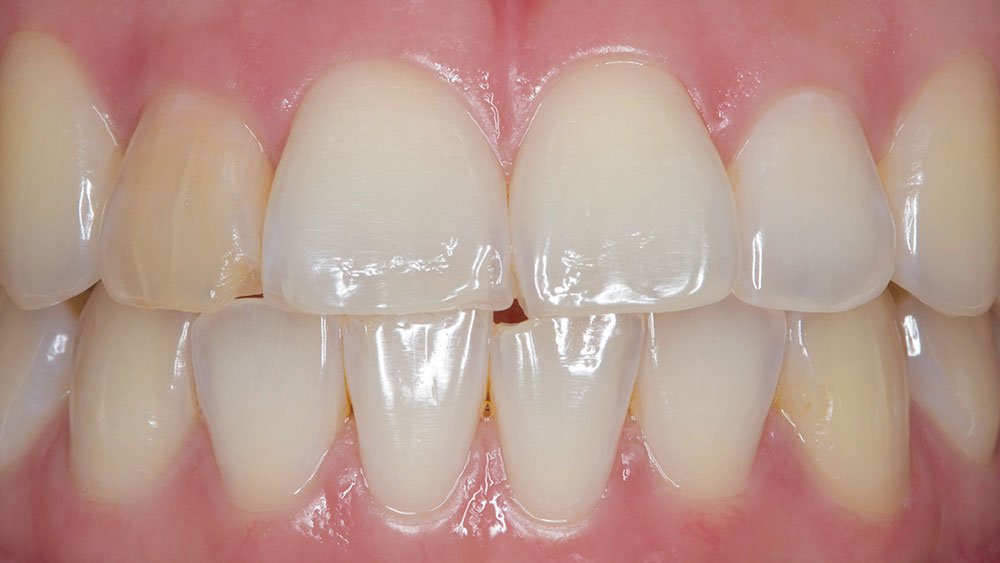
Figure 8: “After” shot illustrating the success of the restoration. Shooting from the proper perpendicular angle is particularly important in post-procedural images to ensure that the true size and position of the restoration is captured in full without distortion caused by angling.
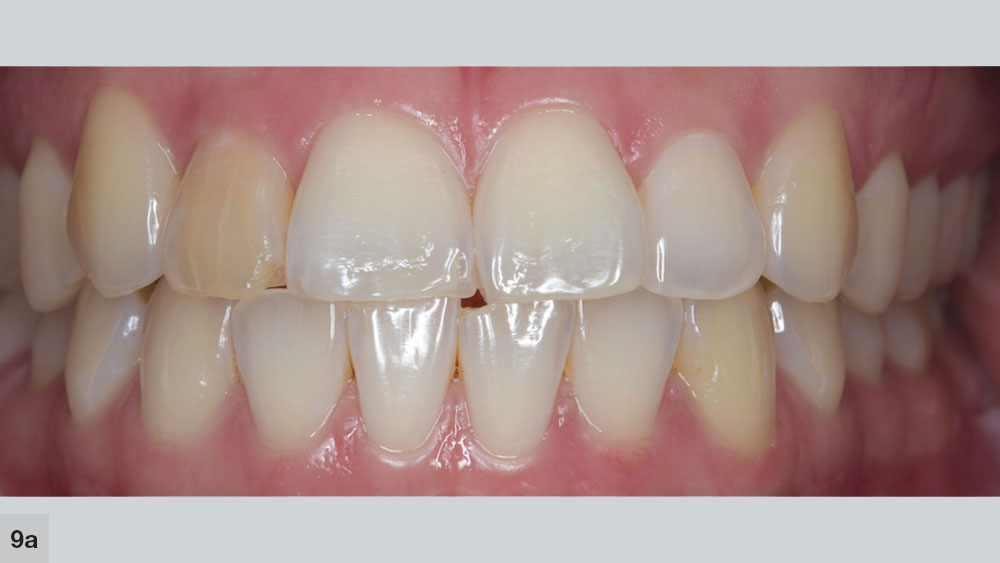
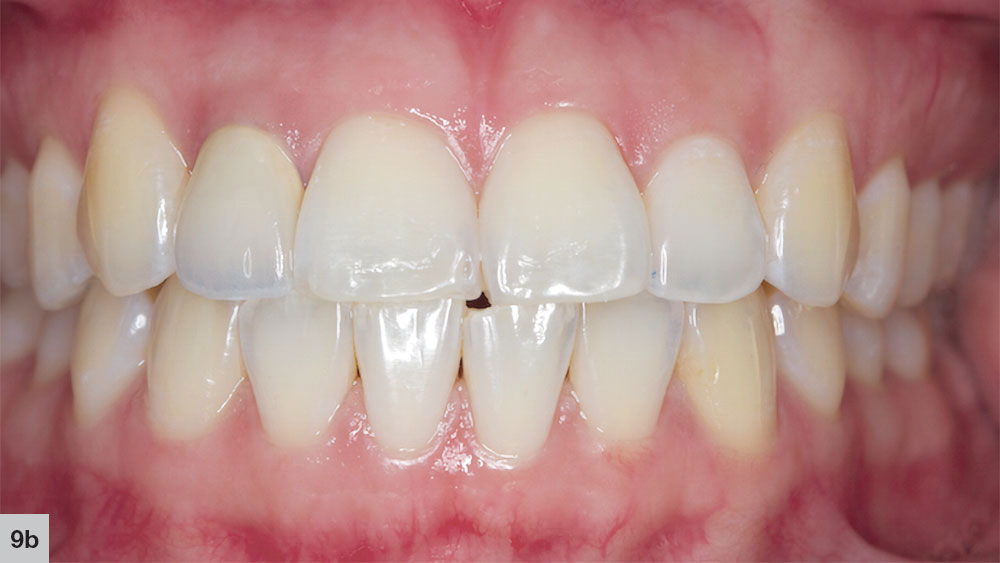
Figures 9a, 9b: End your case documentation photos with a comparison photo illustrating the patient’s original dentition side-by-side with the final outcome. These images are ideal for showing patients how much their teeth have improved. Shooting from a consistent angle under similar conditions limits distractions and showcases the improvement for maximum effectiveness.
Figures 9a, 9b: End your case documentation photos with a comparison photo illustrating the patient’s original dentition side-by-side with the final outcome. These images are ideal for showing patients how much their teeth have improved. Shooting from a consistent angle under similar conditions limits distractions and showcases the improvement for maximum effectiveness.
- 1
- 2
- 3
- 4
- 5
- 6
- 7
- 8
- 9
- 10
- 11
CONCLUSION
High-quality photographs are crucial tools for your practice. They allow your patients to see the improvements in their teeth from start to finish, and can be used in creating marketing materials such as brochures or websites. They’re also extremely helpful for communicating with labs or for providing educational documentation of treatments completed, either for yourself or for your colleagues to study.
And remember, as with any skill, the more you practice, the better your results will be.